Activity Zoom: Guide for lecturers

Video conferences with Zoom offer a very good way to deliver synchronous courses digitally and at distance. With the Zoom activity, you can easily create and use Zoom meetings within your Moodle course.

We would like to provide you with instructions on how to use Zoom within Moodle:

Target group
Lecturers

Goals
Communication & Interaction

Further documentation

Moodle Version 
Article is based on
Moodle Version 3.9

Author
Alexander Bias
kiz - Information Systems Department
Research & Education Services Team

Context
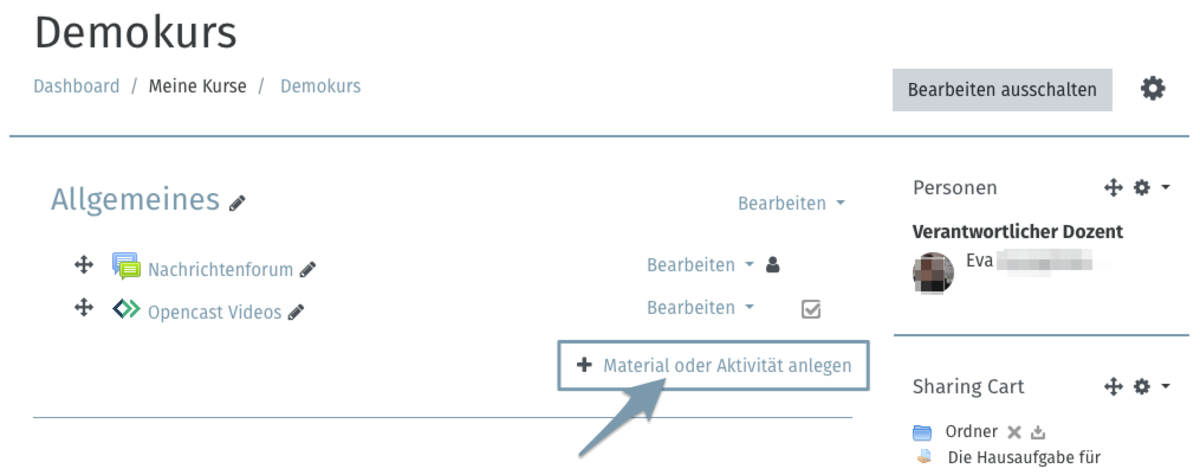
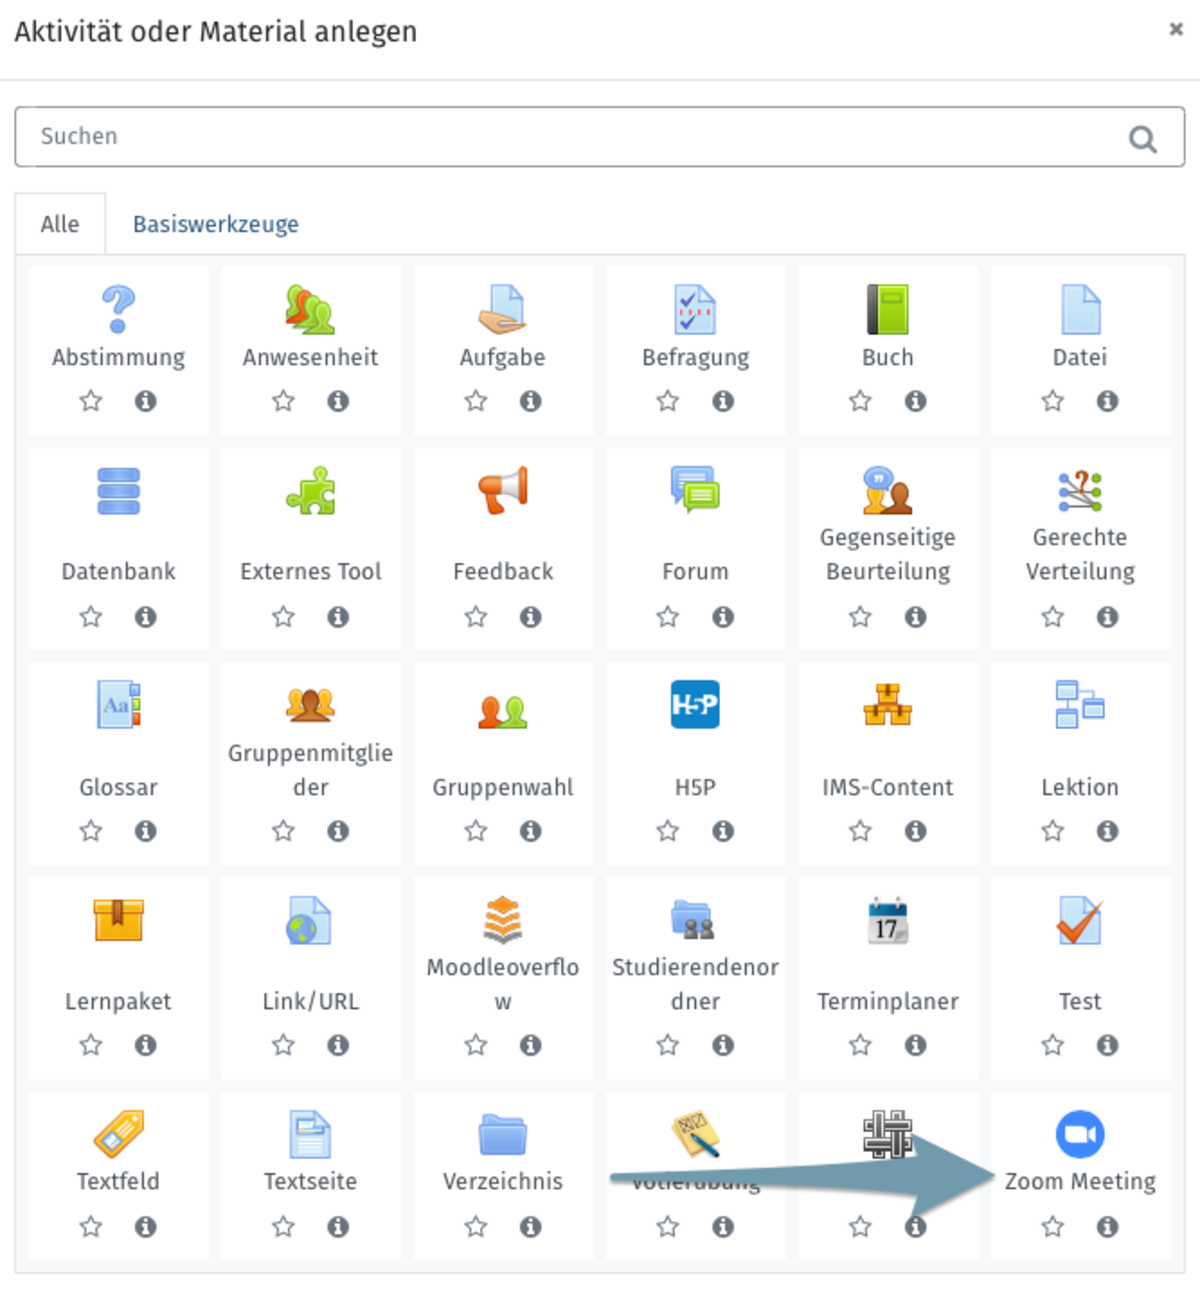
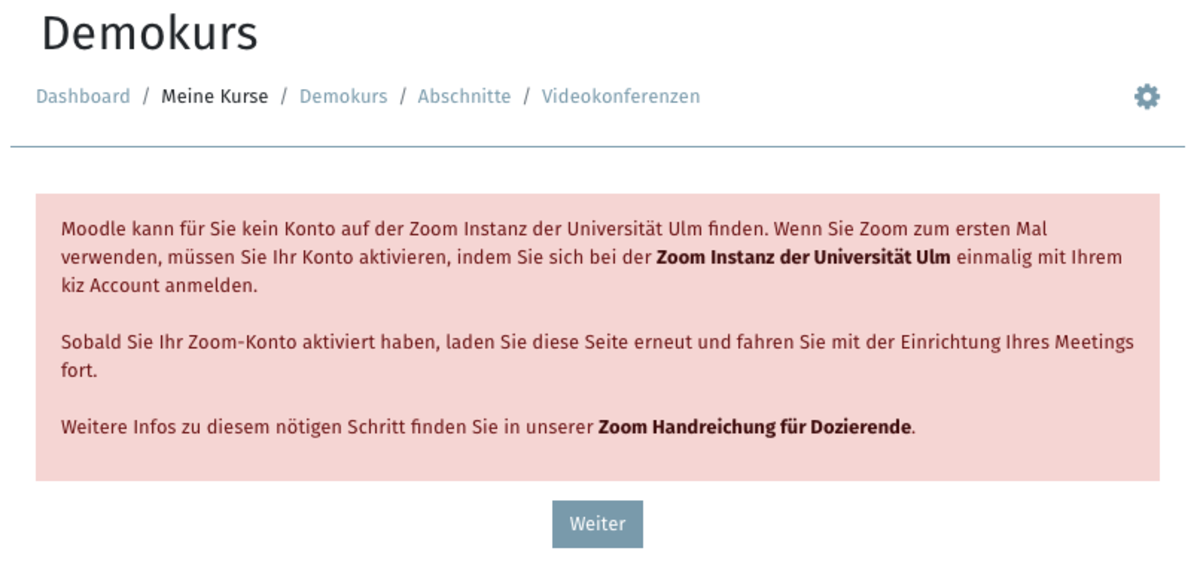
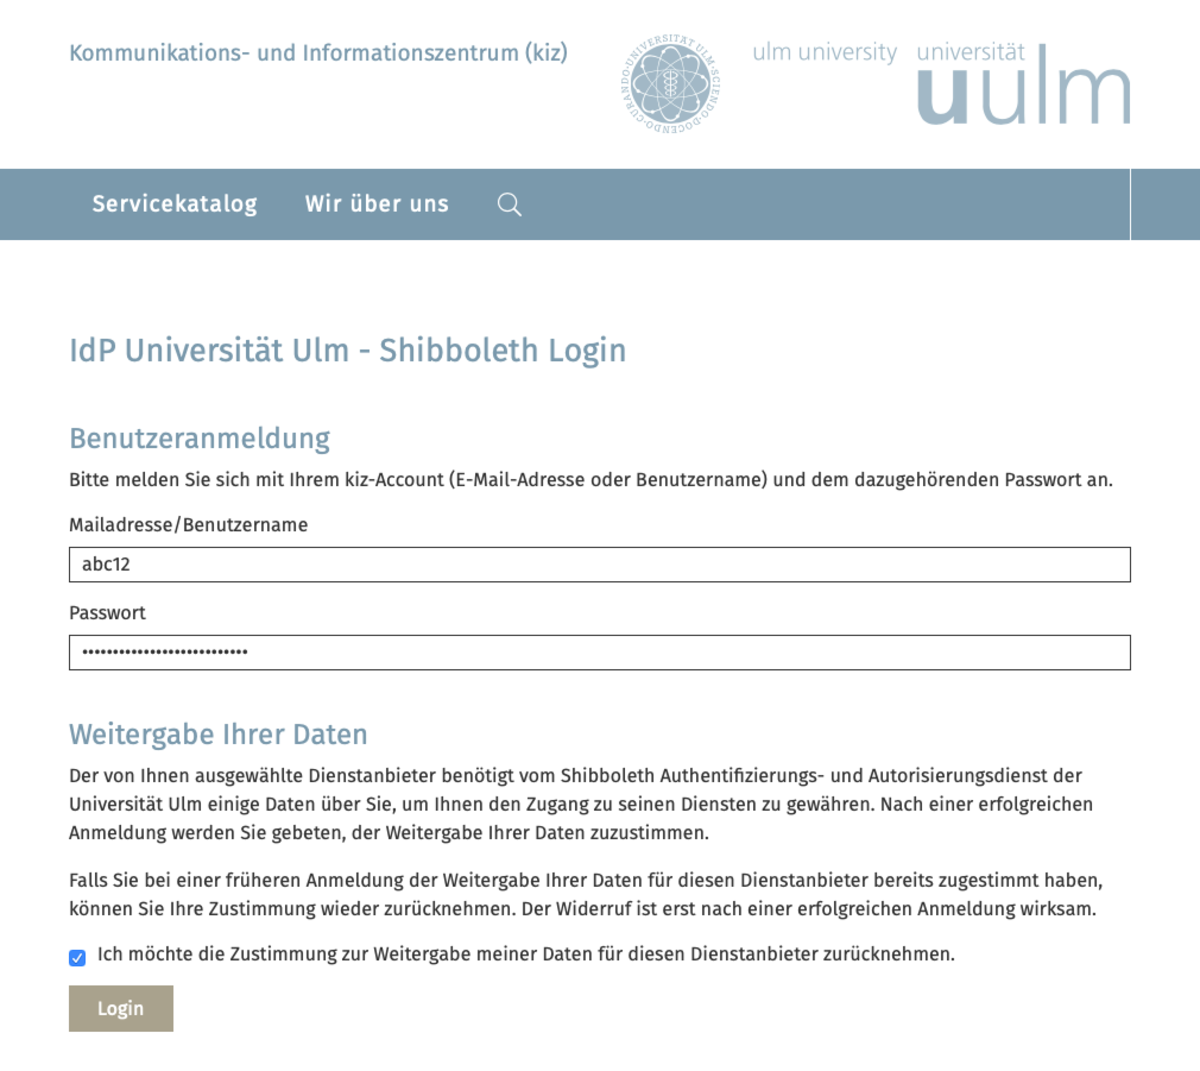
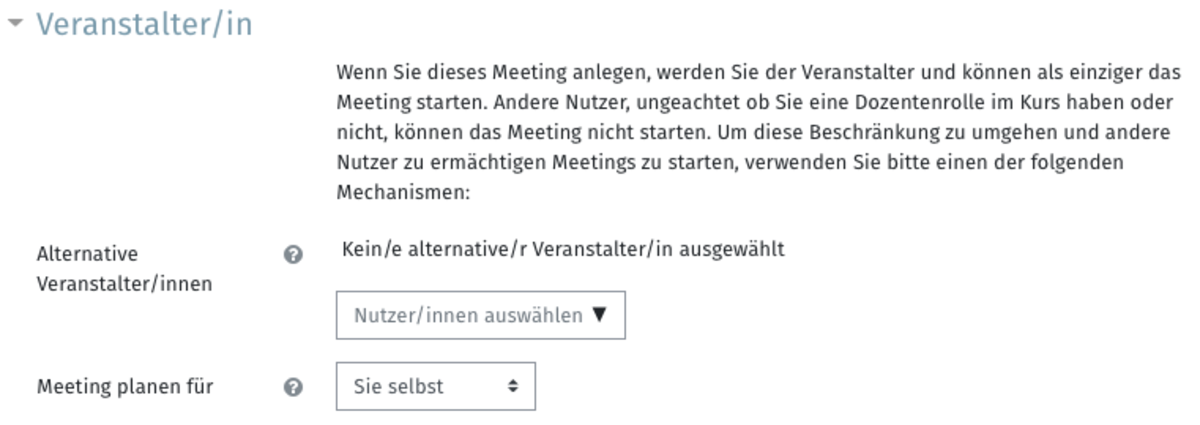
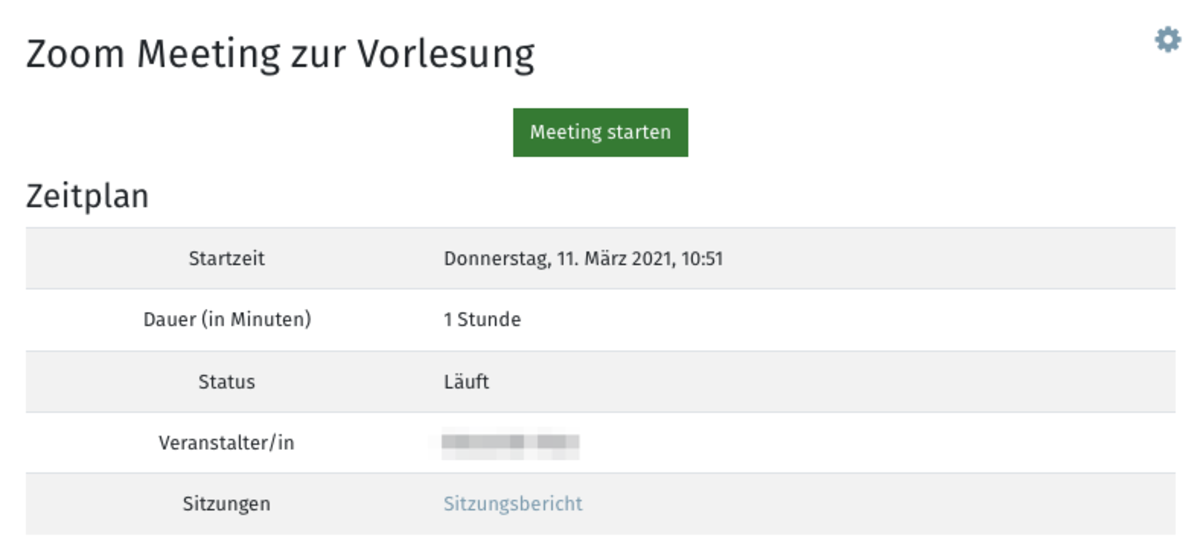
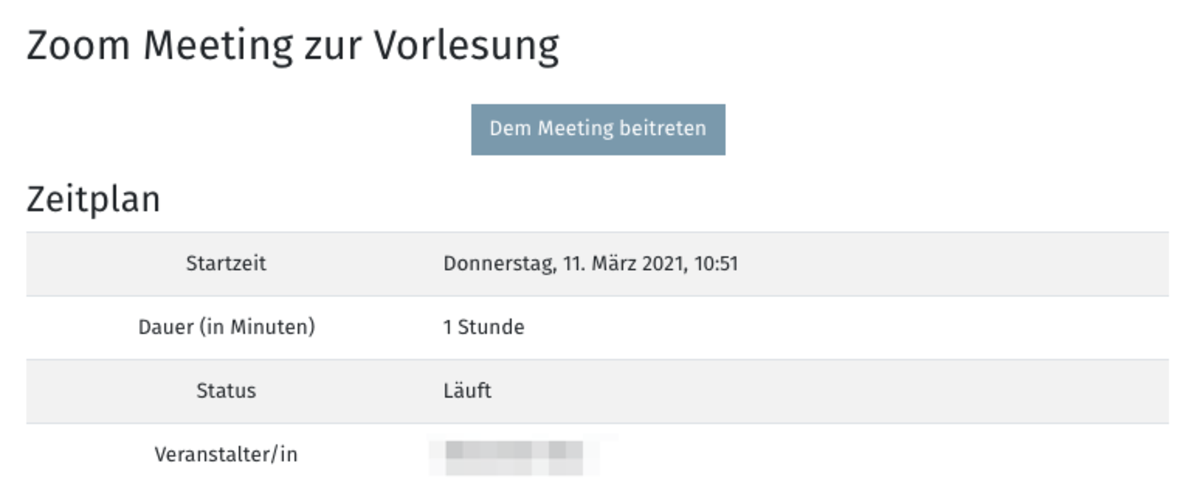
Activities & Materials > Activity Zoom

License
This article is licensed under a Creative Commons license
All information about the license

Technical framework
for the best possible use of zoom

  • Installing the Zoom client or app for your device. The client installation is automatically offered to you when you first join a Zoom meeting from within Moodle. Alternatively, you can join a Zoom meeting using the browser only, but in this case not all Zoom meeting features will be available. We recommend this method only in exceptional cases.
     
  • A headset and, if video participation is planned, a webcam
     
  • A sufficiently fast Internet connection with at least 1 MBit/s download and 0.5 MBit/s upload, but ideally 5 MBit/s download and 1 MBit/s upload.
    A speed test is available to check these values.
     
  • It is also best to connect your end device directly to the network via LAN cable. This way, you can ensure that a WLAN that is overrun by too many users does not cause connection problems.

Licensing conditions
for the use of Zoom

  • The use of Zoom is license-based. Sufficient licenses are available for the use of Zoom at the University of Ulm.
  • Lecturers who want to create and start a Zoom meeting in Moodle need a Zoom account and a Zoom license as described below.
  • The standard Zoom license for lecturers covers meetings with up to 300 participants and no time restrictions. For meetings with more participants, an additional license is required. If Moodle detects that your course has more than 300 participants, you will see a message in the Zoom activity that your Zoom license may be too small. Please contact the kiz helpdesk to get a larger Zoom license.
  • Students and other participants who attend a Zoom meeting but do not start it themselves do not need an own Zoom account and Zoom license.

Important note for lecturers who delegate the organization of their Moodle courses:

Only the Moodle user who creates the Zoom meeting in Moodle can start it later! This is a licensing restriction of Zoom.

In case you do not want your meetings to be created and started by the same Moodle user, please be sure to use the Alternative Organizers or Schedule Meeting For mechanisms described below.

Creating a Zoom Meeting activity

Prerequisite: Edit mode

In order to add the activity to your course, please switch the course to the edit mode by clicking the Switch on edit button in the header (Fig. 1).

Create activity

Then click Add Material or Activity in the section where you want to add the activity (Fig. 2).

In the window that opens, select the Zoom Meeting entry and then click Add (Fig. 3).

Figure 2
Figure 3

Activating and licensing a Zoom account

Moodle checks if your Zoom account is already activated and assigned a Zoom license when you create the Zoom Meeting activity. If you already have a Zoom license, you can proceed directly to the next section.

However, if this is not the case, you will receive a message directly in Moodle and will not be able to create the Zoom Meeting activity (Fig. 4).

In this case, you need to activate your Zoom account first. This step is necessary only once.

Please follow the link to the Zoom instance Zoom instance of the University of Ulm and click on Create Account (Fig. 5).

On the following page, log in to the identity provider of the University of Ulm with your kiz account (Fig. 6) and then confirm the transfer of your data to Zoom.

At the end of this process, you will be logged into the Zoom web interface and will be able to confirm consent to use Zoom at Ulm University (Fig. 7 - TODO).

It would now be possible for you to schedule meetings directly in the Zoom web interface. However, this is the wrong way to use Zoom in Moodle. Please go back to Moodle and create a Zoom meeting activity in your Moodle course again.

Figure 4
Figure 5
Figure 6
Figure 7

Zoom Meeting settings

Subject and description

Please give the new Zoom Meeting a topic (Fig. 8) with which it will be presented in the Moodle course. Optionally, you can add a description and display it on the course page as well.

Schedule

Zoom meetings normally have a schedule, which means they have a start time and a duration. By default, the meeting is set so that the start time corresponds with the creation time and the meeting has a duration of one hour.

Please adjust the Start and Duration setting according to your needs (Fig. 9). This information is relevant for the access to the meeting as well as for the entries in the Moodle calendar and on the Moodle dashboard. However, the meeting will not automatically end if the set duration is exceeded.

Alternatively, if you mark your Zoom meeting as a reoccurring meeting, you can select several options: No specific time, Daily, Weekly, or Monthly (Figure 10).

For Zoom meetings that occur at a known frequency, please set the appropriate applicable daily, weekly, and monthly intervals.

With the No specific time option, Moodle will not generate the calendar and dashboard entries. In this case, students must first go to your Moodle course, find the Zoom activity, and open it. Therefore, we recommend using this option only in justified cases.

Figure 8
Figure 9
Figure 10

Additional Meeting Settings

Safety

In the Security section you can set various security aspects of the meeting (Fig. 11).

The Passcode setting allows you to replace the passcode preset using a random value with your own passcode. The passcode is not requested when entering the meeting from within the Moodle course. It is only relevant if you want an external participant to be able to join the meeting from outside Moodle using the meeting ID and passcode.

The Encryption setting allows you to increase the confidentiality level of the meeting from advanced encryption to end-to-end encryption. End-to-end encryption means that the encryption key is stored on your local device and no one, not even Zoom, can obtain it. With end-to-end encryption, however, several meeting functions are not available.

The Waiting Room setting allows you to activate a waiting room in the meeting, which requires the organizer to control and approve the access of each participant. This option is useful for confidential seminars and group work, but not for large lectures.

With the setting Join before organizer you can enable the meeting participants to enter the meeting (up to 15 minutes) before the organizer joins. This option is useful if you expect the organizer to join the meeting very punctually and then start the meeting directly.

Media

In the Media section you can set the media usage of the meeting (Fig. 12).

The Organizer Video setting allows you to set whether or not the organizer's video is automatically enabled at the beginning of the meeting. This setting only applies to the initial state of the video, the organizer can turn the video on and off at any time in the meeting. The same applies to the Participant video setting.

The Audio Options setting allows you to define whether participants can only join the meeting using computer audio, i.e. with a headset and microphone in the Zoom Client and the Zoom App, or whether they can also or even exclusively join the meeting via telephone dial-in. By default, all options are open here. Please switch off the telephone dial-in only in justified cases and when you are sure that all participants can use computer audio without any problems.

The Mute on joining setting allows you to set whether or not the participants' sound is automatically muted at the beginning of the meeting. This setting applies only to the initial state of the sound; participants can turn the sound on and mute it at any time in the meeting.

Figure 11
Figure 12

Planning and conducting Zoom meetings together

Only the Moodle user who created the Zoom meeting in Moodle can start it later! This is a licensing restriction of Zoom. In case you do not want your meetings to be created and started by the same Moodle user, please use one of the following two mechanisms (fig. 13).

Alternative host

The Alternate hosts setting (Fig. 13) allows you to give other Moodle users in the Zoom meeting permission to start the meeting and act as hosts in the meeting itself. Alternate hosts can be selected from a predefined list of Moodle users who

  1. are enrolled in the Moodle course,
  2. have one of the course roles responsible lecturer, accompanying lecturer, secretary, communicator or have been assigned lecturer rights in the activity context
  3. and already have a Zoom account as well.

You can appoint as many alternative hosts as needed. You yourself will still be listed as an organizer in the meeting and will also be displayed as an organizer on the overview page of the Zoom Meeting activity for the participants.

As an organizer, you can only start two Zoom meetings at a time or have them started by an alternative organizer. This is a licensing restriction of Zoom.

If you are scheduling Zoom meetings for an entire institute or even an entire department, please consider using the Schedule Meeting For feature as an alternative.

Schedule meeting for

The Schedule meeting for setting (fig. 13) allows you to create a Zoom meeting on behalf of another Moodle user. This other user will then be added to the meeting as the organizer and will also be displayed as the organizer on the overview page of the Zoom meeting activity for the participants. The meeting will then also be run with the other Moodle user's Zoom license. The end result is the same as if the other Moodle user had created the meeting themselves.

In order to use the Schedule Meeting for feature in Moodle, the user for whom you are creating meetings must grant you the necessary rights directly in Zoom. Only then will you see this feature in the meeting settings in Moodle.

This step is clearly described in the official Zoom documentation.

Figure 13

Entering a Zoom Meeting

If you click on the Zoom Meeting activity in the course (Fig. 14), you will get to the overview page of the Zoom Meeting activity (Fig. 15). On this page, all information and facts about the meeting are summarized in several tables. As the organizer (or alternative organizer) of the meeting, you can start the meeting by clicking the Start Meeting button (Fig. 15).

Students see a slightly reduced amount of information on the overview page and can join the meeting once it has been started by the organizer (or alternative organizer) by clicking on the Join the meeting button (Fig. 16).

When you click on the button, a new browser tab opens in which the Zoom website is loaded and from where the Zoom Client is started (Fig. 17). If the Zoom Client is not yet installed on your end device, you will be offered to install the Zoom Client at this point. If necessary, you can also start the Zoom Meeting in the browser at this point, but we do not recommend this.

Figure 14
Figure 15
Figure 16
Figure 17

Working in Zoom Meeting

At this point, you have successfully planned and entered the Zoom Meeting.

For the actual work in the Zoom Meeting, please refer to our further instructions: