What is SOGo?
SOGo is a modern groupware that integrates calendars, e-mail and address books. You can create calendars to share with others, set appointments and define tasks. The possible uses of Sogo are manifold, e.g.:
- Management of working groups
- Work schedules
- Room management
- Course management
- Appointment management (boss/secretary)
- a. o. m.
Contents of this manual:
- Log in
- New calendars and settings
- Set user rights
- Appointments and tasks
- Address Book and Calendar Modules
- E-mail absence and forwarding
- Other
Log in to Sogo
You can find Sogo in version 4 with a new interface at the address:
sogo.uni-ulm.de/SOGo/so/
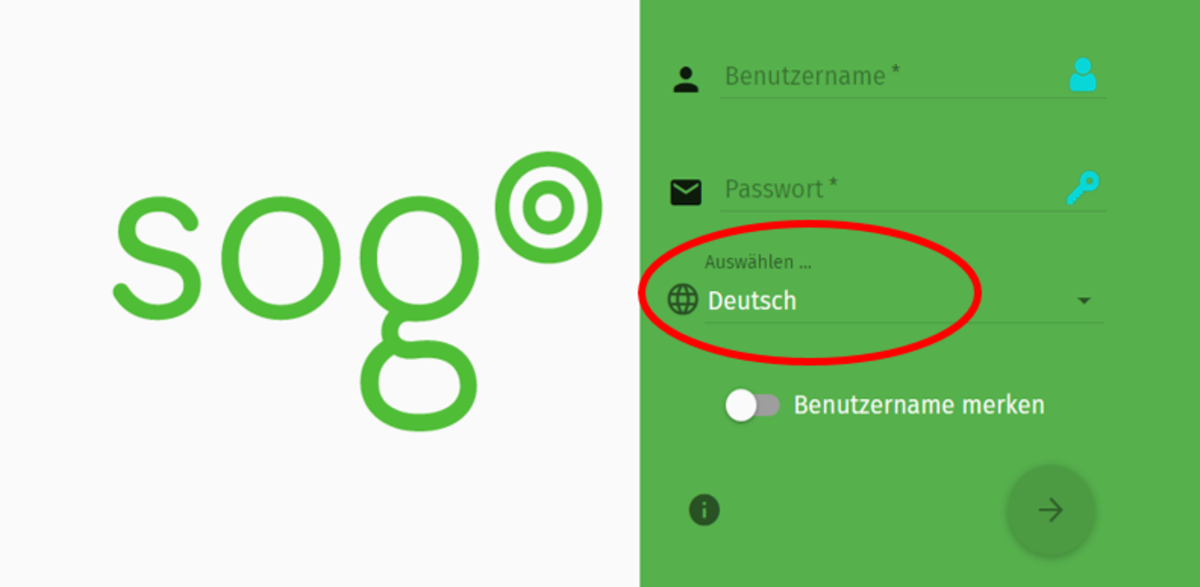
Log in with your user name or e-mail address and your password.
You can also select a language.
New calendars and settings
Use the (+) symbol next to Calendar List to create a new calendar. Enter the name of the calendar (here Test Calendar) and click OK (1).
- Calendars are shown or hidden via sliders (here test calendar and personal calendar) (2). You can access the settings via the menu.
- Select a colour for your calendar and make further settings if necessary (3).
- Please note that only the owners may delete calendars.
Use the (+) symbol next to Web Calendar to create a new web calendar (4). Enter the URL of the new calendar (here kalender.de) and click OK.
 New calendar")
 Settings")
 Calendar colour")
 New webcalendar")
Set user rights
Sogo knows three types of appointments: public, confidential and private. For each type, rights can be set and distributed to people.
There is a default for the Personal Calendar and all calendars you create yourself (1). According to this, all authenticated users of the University of Ulm (= all persons with a @uni-ulm.de address) see the date & time of the public and confidential appointments. Of course, this default setting can be changed by you. For the aforementioned group of persons, the rights can be set to <None>, for example (2).
To set user rights for individual users, please proceed as follows:
- Select User rights in the menu of the corresponding calendar. (3).
- Select the person to whom you want to grant rights for your calendar: Enter the name and wait for the search process (4).
- Now select the appropriate rights for Public, Confidential and Private and confirm your selection with Save (5).
- To complete the process, you must tick the button 'Subscribe for the user' (6). Save these settings as well. The person concerned should now see the calendar on the calendar list.
Examples:
Working Group (WG): All members of an WG should be able to see the details of an appointment (Right : See all). Confidential appointments should not be visible (right : None) (7).
Mission Plan: All members should see the details of the assignment (See All). An assistant should also be able to change, create and delete appointments (right to change, add and delete) (8).
Room planning: One person is informed about the occupancy of a room (date & time). A second person needs to know details to prepare the room (See All). Finally, confidential messages are shared with another person (Confidential : See all) (9).
For invitations, all appointments are taken into account that are in calendars for which 'Include in availability' is ticked (10, free/busy display). This is the case every time a new calendar is created. For appointments, 'Show time as available' must NOT be ticked (11).
 Calendar Default")
 Change default setting (All authenticated users)")
 Calling up the user rights")
 Selection of a person")
 Set rights for all appointment types")
 Subscribe for the user")
 Allocation of rights Working group")
 Allocation of rights for the deployment plan")
 Allocation of rights Room management")
 Free/occupied indicator")
 No availability on the date")
Dates and tasks
New appointments and tasks are initiated via the green (+) symbol (1, 2):
1 Select the calendar for which the appointment is intended.
2 Give the appointment a name, e.g. Meeting.
3 Enter the location.
4 Describe the appointment in more detail, if necessary.
5 Add categories if necessary.
6 You can also select All-day appointment.
The example appointment is Public and has a high priority of 3. It takes place at a specific time.
Dates can also repeat (3): in the example every fortnight on Tuesday and Friday. The date starts on 27 Feb. 2019 and ends on 15 Nov. 2019.
For recurring appointments (here weekly), one can change a single instance or all instances (4).
It is possible to copy or move appointments from one calendar to another (Copy/Move To) (5).
Figure 6 shows a typical task with normal priority and the category Continuing Education.
 New dates and tasks")
 Public appointment")
 Repeat appointment")
 recurring appointments")
 Copy and move appointments")
 Typical task")
Address Book and Calendar Modules
The cogwheel icon takes you to the settings, e.g. General: Language, Time Zone, Date and Time Formats and Default Module (1).
In the address book you can create different contact categories (2).
In the example, the calendar has been created so that the start of the day is at 7 a.m. and the end of the day at 8 p.m. (3). Wednesday is omitted as a working day. Times outside working hours are displayed as occupied. Appointments are always created as public.
Appointments can be further specified with the help of categories (4). Categories such as birthday, holiday or supplier are preset. New categories are created with Add calendar category. These appear in colour at the edge of an appointment, e.g. as yellow and blue for the Lecture appointment. The (-) symbol can also be used to delete a category.
 Settings General")
 Address book settings")
 Calendar settings")
 Calendar settings: Categories")
E-mail: Absence and forwarding
You can compose an automatic out-of-office message (1):
1 Activate the out-of-office message
2 Fill in the subject (required entry) and the message.
3 E-mail addresses field (required entry): Add the default address. E-mail addresses that are forwarded to the local account, e.g. from private mail providers, will also receive a reply e-mail. Please enter the addresses, separated by commas.
4 Days between replies: You can set after how many days someone will receive a reply (here: 7).
5 Set time
- either fill in 'Switch automatic absence message on and off', or
- only fill in 'Switch off automatic absence message on' AND activate 'Always send absence message': The recipients will then receive an absence message until the switch-off date.
- If 'Always send absence message' is selected, the message is sent permanently.
6 These settings are saved with the help of the green diskette symbol!
Please note further options if necessary!
You can forward your mails to other addresses and, if necessary, also keep a copy for yourself (2). Please ensure that data protection is guaranteed if you receive private mails, for example.
 E-mail: Absence and forwarding")
 E-mail: Forwarding")
 Views of the calendar")
 Import calendar (courtesy of schulferien.org)")
Communication and Information Centre (kiz)
Please contact us if you have questions or problems related to the kiz services:
Office hours
Monday - Thursday
09:00 h - 12:00 h and 13:00 h - 15:30 h
Friday 09:00 h - 12:00 h
Phone
+49 (0) 731 / 50 - 30000
Telefax
+49 (0) 731 / 50 - 1230000
Order a Callback
helpdesk(at)uni-ulm.de
Support Portal (Uni internal)
[more]
Service Points are locations where you can visit us personally.
Using self-service functions of the Identity Management System (IDM): Administer permissions, subscribe to services, change passwords.
Research in the library stock: monographs, textbooks, magazines, university publications, e-books, e-journals, national licenses, and the contents of the institutional repository OPARU.
With about 400 keywords you will get direct access to our services. If something isn't listed, please contact our Internet Editorial Office.